17 October, 2016

Trick to Boost Reliance Jio Free Internet Speed

Boost Reliance Jio Free Internet Speed


Well as many of you all were requesting for this trick about how we can increase Reliance Jio internet speed, so we are presenting a new simple APN (Access Point Setting) setting which which can help you boosting your reliance jio free internet speed without using any vpn or other tweaks, its a pretty sweet and simple trick which you can try out.
We do not guarantee that this trick will 100% work out but yes we found that this new hidden apn settings works well for increasing Reliance Jio internet speed.


As you know users are increasing rapidly and due to this internet speed is decreasing due to high loads on servers. Also the thing is very simple to understand that every one is enjoying free Reliance Jio services and will be using till 31 December 2016. For reliance Jio plans and price you may refer to this article: Reliance Jio Tariff Plans Commercial launch 5th September
Let’s get started with the trick:

Boost Reliance Jio Free Internet Speed

#1. Access Point Settings:
  1. First if you using a Android smartphone just need to tap on Settings >> Mobile networks >> Access Point (This might be different as per the manufacturer default OS).
  2. Now tap on Create new access point settings.
  3. Enter Access point name as : Reliance Jio
  4. Enter Access point as : JIODATA
  5. Apn Type : Default
  6. Save setting, enable mobile data transfer.
  7. All done ! Turn on Reliance Jio Mobile data and try checking internet speed with speedtest.net for better comparable results

#2. Access Point Settings:
  1. Navigate to Settings >> Mobile networks >> Access Point (This might be different as per the manufacturer default OS).
  2. Now tap on Create new access point settings.
  3. Enter Access point name as : Reliance Jio
  4. Enter Access point as : JIODATA
  5. Apn Type : Default
  6. Enter Proxy : 202.88.241.12
    Port : 80
    Enter Server name : www.google.com
  7. Save setting, enable mobile data transfer.
  8. All done ! Turn on Reliance Jio Mobile data and try checking internet speed with speedtest.net for better comparable results.

Airtel V-Fiber service Free Unlimited Internet + Voice Calls

Airtel V-Fiber

To rival Reliance JioFiber broadband, Airtel has thought of new administration called Airtel V-Fiber. It utilizes fiber and vectorization innovation to convey ultra high speeds. Here we are going to enroll most recent Airtel V fiber arranges, its correlation with other comparable administrations, welcome offers and initiation points of interest.

Airtel V fiber Plans, Airtel Vfiber Broadband Plans: Hello companions Airtel has propelled ‘V-Fiber” innovation that presents to 100 Mbps speed. Existing Airtel broadband client can now get superfast v fiber speeds at no additional month to month cost. They require just modem change. New clients will get boundless three month trial (free web) offer with boundless neighborhood and STD calls to any system.


Airtel Recently Launched their V-Fiber benefit where the clients will Get Super quick 100Mbps web speed with 3 month Internet and free calling . Presently this administration is discharged in Chennai just however they guarantee to grow it for Delhi and NCR , Bangalore and all different urban areas of India .
On the off chance that you are have a Question in your Mind that ‘What is Airtel V-Fiber benefit then we should me Explain it is a novel mix of fiber and Vectorization innovation that conveys super quick speed. That implies quicker downloads, less buffering, and a ultra-dependable Wi-Fi association for every one of the gadgets in your home.
Benefits Airtel V-Fiber
  1. Unlimited broadband access for 3 months.
  2. Free 100 GB/month data credit at speed of 40 Mbps & then it will be reduced to 512 Kbps.
  3. Free calling to all networks across country.
Airtel V-Fiber
Airtel V-Fiber
Plans for Airtel Broadband V-Fiber
  1. Rs.2299 plan: 275GB
  2. Rs.2399 Plan: 300GB
  3. Rs.2449 Plan: 350GB
  4. Rs.2499 Plan: 375GB
  5. Rs.2849 Plan: 450GB
  6. Rs.2999 Plan: 500GB
  7. Rs.3499 Plan: 600GB
  8. Rs.3649 Plan: 650GB
  9. Rs.3999 Plan: 750GB
  10. Rs.4499 Plan: 875GB
  11. Rs.4999 Plan: 1000GB
These offer are currently only live at Chennai circle, hope for the best to get to your city as well we will keep inform you.
How to get

Airtel V-fiber Broadband Offer, V fiber Broadband Connection?

For New Users:
  1. Visit Airtel V-fiber official page to prebook here : Airtel Broadband V-fiber Registration
  2. Select City and proceed next.
  3. Select plan and click on Book now.
  4. Provide your Address and your mobile number.
  5. Review your plan and proceed next.
  6. Finally click Submit / Register .
  7. All done for the booking process.

For Existing Broadband Users:
Existing Airtel Broadband users can also upgrade to Airtel Broadband v-fiber plans just follow the steps below.
  1. Visit here : Airel Broadband V-fiber
  2. Enter these follwing details : Your Name* Mobile Number* Email ID DSL-ID / Landline Number*
  3. Click to Upgrade and you are done.
We hope you got this process right, yet if you are having any confusion related to this article let us know via comments below

14 October, 2016

How to Use Your Phone as a Webcam

How to Use Your Phone as a Webcam


Android

A quick search on Google Play throws up several webcam applications. We tried 5 of the top 10 results, but most didn't work properly. From the ones that didn't crash repeatedly, SmartCam failed to show the video, and DroidCam needs you to install an app on Windows to work.
IP Webcam is easily the best of the lot because it works through your browser, which gives it the cross-platform compatibility.
To set up a security camera on Android, follow these steps.
1. Connect your computer and the phone to the same Wi-Fi network.

2. Install the IP Webcam app on your smartphone.

3. Close all other camera apps. Force close them from the app switcher before you proceed.
4. Launch the IP Webcam app. Scroll to the bottom and tap Start server.
5. The app will now fire up your phone's camera and display a URL. Our URL was http://172.32.15.110:8080.
6. Enter this URL in any browser on your computer and hit Enter.
7. In the browser, you'll see a drop down menu next to Video renderer. Select Browser.

8. Below that, you'll see Audio renderer. Select HTML wav.

Now you'll see a live video feed in your browser. You can also record this footage via the browser. To do this, just press the red Record button under the video. This saves the footage as an MP4.There will be a slight lag if you enable HTML wav audio in the browser. You can select the Flash option (doesn't work on all computers) or open the same URL in VLC Media Player.
9. To do this, first download and install VLC from this website. Then in VLC, go to Media > Network Stream and enter the URL from the app as seen in step 5.
Once the app is running, you don't need to keep your phone's screen on. It works even when the phone is locked, but the video feed is slightly smoother when the screen is on.


iOS

Two of the most popular webcam apps on the App Store are EpocCam and PocketCam. We tried setting up PocketCam, but the process was too complicated and even when we did manage to set it up, we found that the free version limits you to black-and-white video and no audio. There's a paid version that gives you access to all of PocketCam's features.
On the other hand, EpocCam is free (with ads) and it is very easy to set up. That's why we would recommend using EpocCam. This is how:
1. Make sure your phone and computer are on the same Wi-Fi network.
2. Download the EpocCam app on your iOS device and Windows or Mac machine.
3. When you install EpocCam it will prompt you to install some drivers. Click Install anyway in both cases. These are audio and video drivers that let the app act as a webcam.
4. Start EpocCam on your iPhone and your computer.
5. The app automatically searches for other devices running EpocCam on the same Wi-Fi network. Soon, the video from the iPhone will automatically show up on your computer. EpocCam lets you use only one device as a camera at a time.
While this app generally works well, we found that at times the phone and the computer couldn't connect to each other. Restarting the app on both devices quickly fixed the issue for us. There's no recording feature in this app, but you can easily setup a screen recorder app such as Camstudio on your computer to record the feed from your iPhone, if you want to use the phone as a security camera and not a CCTV feed.


Video calls

You can also use your phone as a webcam to make video calls from a computer. You can use your phone as a camera to chat using Skype. There are two stages to this - setting up the camera on your phone, and setting up Skype to use the phone as a camera. We'll walk you through each stage of the process.
First, you need to set up the camera using an app on either your Android phone or iPhone. This is how:

Android

Here's how to set up your Android smartphone as a webcam. IP Webcam does not work with Skype, so you'll need to install DroidCam and its PC client for this to work:

1. Install DroidCam Wireless Webcam on your phone.

2. Download and install the DroidCam client on your computer. Both the phone and the computer should be on the same Wi-Fi network.

3. Open the Android app and note down the Wifi IP listed on the main screen.
4. Open the Windows client and paste the IP on the computer.
5. If you have a slow Internet connection, pick Low from the Video Quality drop-down menu.
6. Click Start.
7. Now you'll see video from the phone on the DroidCam Windows app. This works even if your phone is locked, but the video stutters. For optimal performance, we recommend that you keep the Android app open and turn off auto-lock on the phone.
8. Restart Skype (if it is open) and select DroidCam Source 1 as the webcam (explained after the iPhone section).
9. Now you can use your Android phone as the webcam.

iPhone

If you're using an iPhone then you can use EpocCam. Download it and then install and run the app on your computer and phone, as described above. Once again, both devices need to be on the same Wi-Fi network - if they are, then they will connect to each other automatically. Note that the app stops working if you hit the home button or lock your phone. EpocCam has an Android app too, but it crashed repeatedly in our tests, so we suggest you stay away from it.
1. Install and run EpocCam on your computer and iPhone, as mentioned earlier.
2. Open Skype and select EpocCam as the webcam (explained below).
3. Now make a video call to any of your contacts. You'll be using the iPhone as a webcam for the call.
Changing the default camera on Skype
After you've gotten your phone to work as a webcam (using DroidCam or EpocCam), you need to change the settings in Skype before you can use your phone as a webcam. This is what you need to do:
1. Download and install Skype if you haven't already. Third-party cameras don't always work well with the Windows 8 style Skype app, so you will need the desktop version.
2. Once Skype is running and you have signed in, you'll need to go to Tools > Options.
3. Click Video settings under the General tab.
4. Select the correct camera from the drop-down menu next to Select webcam:. The name of the camera varies depending on the app you are using to connect. Android users will have to select DroidCam Source 1, while iPhone users will select EpocCam.
6. Click Save.
You can now use Skype on your computer to make a video call, and it will use the feed from your phone's camera for the video.
If you use any other app to turn your phone into a webcam, let us know via the comments. For more tutorials, visit the How To section.

Mobile as webcam


Video calls
You can also use your phone as a webcam to make video calls from a computer. You can use your phone as a camera to chat using Skype. There are two stages to this - setting up the camera on your phone, and setting up Skype to use the phone as a camera. We'll walk you through each stage of the process.
First, you need to set up the camera using an app on either your Android phone or iPhone. This is how:
Android
Here's how to set up your Android smartphone as a webcam. IP Webcam does not work with Skype, so you'll need to install DroidCam and its PC client for this to work:
1. Install DroidCam Wireless Webcam on your phone.
2. Download and install the DroidCam client on your computer. Both the phone and the computer should be on the same Wi-Fi network.
3. Open the Android app and note down the Wifi IP listed on the main screen.
4. Open the Windows client and paste the IP on the computer.
5. If you have a slow Internet connection, pick Low from the Video Quality drop-down menu.
6. Click Start.
7. Now you'll see video from the phone on the DroidCam Windows app. This works even if your phone is locked, but the video stutters. For optimal performance, we recommend that you keep the Android app open and turn off auto-lock on the phone.
8. Restart Skype (if it is open) and select DroidCam Source 1 as the webcam (explained after the iPhone section).
9. Now you can use your Android phone as the webcam.

iPhone
If you're using an iPhone then you can use EpocCam. Download it and then install and run the app on your computer and phone, as described above. Once again, both devices need to be on the same Wi-Fi network - if they are, then they will connect to each other automatically. Note that the app stops working if you hit the home button or lock your phone. EpocCam has an Android app too, but it crashed repeatedly in our tests, so we suggest you stay away from it.
1. Install and run EpocCam on your computer and iPhone, as mentioned earlier.
2. Open Skype and select EpocCam as the webcam (explained below).
3. Now make a video call to any of your contacts. You'll be using the iPhone as a webcam for the call.
Changing the default camera on Skype
After you've gotten your phone to work as a webcam (using DroidCam or EpocCam), you need to change the settings in Skype before you can use your phone as a webcam. This is what you need to do:
1. Download and install Skype if you haven't already. Third-party cameras don't always work well with the Windows 8 style Skype app, so you will need the desktop version.
2. Once Skype is running and you have signed in, you'll need to go to Tools > Options.
3. Click Video settings under the General tab.
4. Select the correct camera from the drop-down menu next to Select webcam:. The name of the camera varies depending on the app you are using to connect. Android users will have to select DroidCam Source 1, while iPhone users will select EpocCam.
6. Click Save.
You can now use Skype on your computer to make a video call, and it will use the feed from your phone's camera for the video.
If you use any other app to turn your phone into a webcam, let us know via the comments. For more tutorials, visit the How To section.

How to Change default camera on Skype

Changing the default camera on Skype

After you've gotten your phone to work as a webcam (using DroidCam or EpocCam), you need to change the settings in Skype before you can use your phone as a webcam. This is what you need to do:
1. Download and install Skype if you haven't already. Third-party cameras don't always work well with the Windows 8 style Skype app, so you will need the desktop version.
2. Once Skype is running and you have signed in, you'll need to go to Tools > Options.
3. Click Video settings under the General tab.
4. Select the correct camera from the drop-down menu next to Select webcam:. The name of the camera varies depending on the app you are using to connect. Android users will have to select DroidCam Source 1, while iPhone users will select EpocCam.
6. Click Save.
You can now use Skype on your computer to make a video call, and it will use the feed from your phone's camera for the video.
If you use any other app to turn your phone into a webcam, let us know via the comments. For more tutorials, visit the How To section.

for more click here

03 October, 2016

Three passwords to Access your Facebook account

Image result


Yes, You can access your Facebook account with 3 different passwords . I was surporised when i read this message posted by one of my friend in Facebook. So , immediately, i tested whether it is true one or not. Yes, it is working.


Facebook allows the following variation of your passwords:

1. Your Original Password:

Let us assume that you are using "breakTheSecurity" as password. Yeah, you can log in with your default password ;)

2. Your original password with the case reversed(Toggle case):

This one will be interesting one. You can toggle the case of your Password and use it.

For instance, your are using "breakTheSecurity" as your default password. In this password, 'T' and 'S' is Capitalized.

if you toggle the password case, then your password will become "BREAKtHEsECURITY".

3. Your original password with the first letter capitalized:


If the first character of your password is in lower case and you change it to Upper case, you can still login with this one.

For instance, the original password is "breakTheSecurity" . In this password, the first character 'b' is in lower case. If you capitalize the first character, then your password is "BreakTheSecurity".

The reason for 3 Passswords for your facebook account
It is not security flaw. It is just feature provided by Facebook.

"We accept three forms of the user's password to help overcome the most common reasons that authentic logins are rejected. In addition to the original password" Zdnet quoted as Facebookspokesperson saying. " we also accept the password if a user inadvertently has caps lock enabledor their mobile device automatically capitalizes the first character of the password."

Three different Usernames:


1. You can use your Facebook 'Username' as user name(if you have created)
2. You can use your email address
3. You can use use your mobile number ( if you have added your mobile number in Fb).

Yeah, i know this is one of the old one. Now only i come to know about this and like to share with BTS readers. Hope you enjoyed this article.

PC as a wifi Hotspot

Image result


Share Free Internet from PC with Android
There is many Windows software which can be used to get free internet access. But unfortunately there is no such apps for Android platform. So Android users are unable to use free internet on their devices. This article can let you use play store on Android. And of course you can play Android games online. Or verify games data following this article.
  • Connect to PC via WiFi (Preferred), Bluetooth or USB. You can make hotspot either in Android or in PC. Both method works.
  • Download, Install and open CCProxy. (In Windows Vista and later it will ask for permission. So click Yes)
  • Click Options from the top buttons to go to the configuration menu of CCProxy.
  • Untick Auto Detect check box. Then select the local IP begins with 192.168 from the drop downs.
  • Tick the box right to 192.168.43.68. (In your case the local IP can be different)
Click Advanced like the screenshot given below. 


Go to Cascading tab From the Advanced window.
Tick Enable Cascading Proxy. It will give permission to local server to access internet via other proxy.

Write 127.0.0.1 as Proxy Address. And 8080 as port. (If your free net software has different port then write that)

If Proxy Protocol is not selected then select HTTP as proxy protocol. Click OK.

Again click OK at the Configuration window. That's it. Now you can access Your PC's free net via Proxy 192.168.43.68:808 (In my case).

Connect the Free Internet on Android via CCProxy's IP and port
If you made hotspot in Android (I use this method) then you have a use CCProxy's ip and port in your access point. Go to your free internet settings profile in Android and use 192.168.43.68 as proxy and 808 as port. Note that you can use Android as Hotspot server and CCProxy's client as the same time.

And if you're using PC as the hotspot and modem for access free net then while connecting to the hotspot just go to the advanced options and add manual proxy. I think after reading this whole article you know which proxy to use. Though I am telling that. It's that one begins with 192.168. In some GingerBread phone there is no option to set manual proxy in WiFi. So those users should use Android as hotspot and CCProxy's client.

And if you're trying to connect via Bluetooth or USB then. Use Opera (Not opera mini) as the browser and download manager because you can set proxy manually using it. Go to Opera's address bar write about:config press go. Then click Proxy set the local proxy and tab save.


I tried to make this guide as much easy to follow as I can. But maybe some of you are thinking that this is a tough article. I don't have anything to say for them. Please note that in my blog I only write articles for advanced users. (Not for those who doesn't have any brain works for IT realated work). And remember that this free internet can be accessed in any device which can be tethered with PC like Windows Phone or iPhone etc. All you need to do is use CCProxy's ip and port to access internet after getting connected with PC.

How to use windows 10 as wifi hotspot

Image result
Windows 10 includes a feature called "Hosted Network" that allows you to turn your computer into a wireless hotspot, and this guide we'll show you how to do it.
Whether you're connecting to the internet using a wireless or wired adapter, similar to previous versions, Windows 10 allows you to share an internet connection with other devices with a feature called "Hosted Network".
Hosted Network is a feature that comes included with the Netsh (Network Shell) command-line utility. It's was previously introduced in Windows 7, and it allows you to use the operating system to create a virtual wireless adapter – something that Microsoft refers to "Virtual Wi-Fi" — and create a SoftAP, which is a software-based wireless access point.
Through the combination of these two elements, your PC can take its internet connection (be it an ethernet connection or hookup through a cellular adapter) and share it with other wireless devices — essentially acting as a wireless hotspot.
In this Windows 10 guide, we'll walk you through the steps to verify if your network adapter supports the feature, how to configure and enable a wireless Hosted Network, and how to stop and remove the settings from your computer when you no longer need the feature.
To follow this guide, you'll need to open the Command Prompt with administrator rights. To do this, use the Windows key + X keyboard shortcut, and select Command Prompt (Admin).

How to check if your wireless adapter supports Hosted Networks in Windows 10

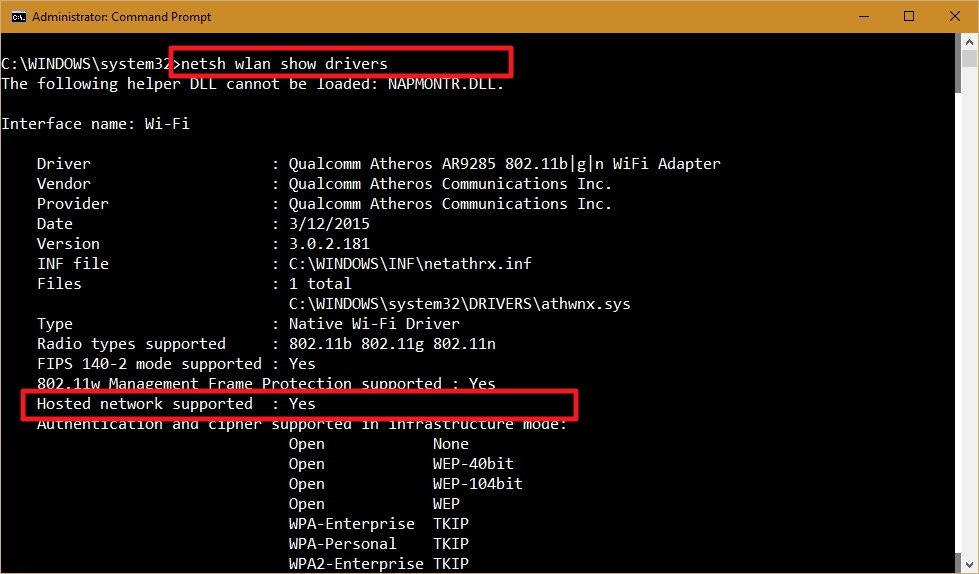
While some adapters include support for Hosted Network, you will first need to verify your computer's physical wireless adapter supports this feature using the following command:
NETSH WLAN show drivers
If the generated output shows Hosted network supported: Yes, then you can continue with the guide. If your wireless adapter isn't supported, you could try using a USB wireless adapter that supports the feature.

How to create a wireless Hosted Network in Windows 10

Creating a wireless hotspot in Windows 10 is relatively straightforward — don't let the command line scare you. Simply follow the steps below to configure a wireless Hosted Network:
  1. While in Command Prompt (Admin) enter the following command:
    NETSH WLAN set hostednetwork mode=allow ssid=Your_SSID key=Your_Passphrase
    Where the SSID would be the name you want to identify your wireless network when trying to connect a new device, and the passphrase is the network security key you want users to use to connect to your network. (Remember that the passphrase has to be at least 8 characters in length.)
  2. Once you created a Hosted Network, enter the following command to activate it:
    NETSH WLAN start hostednetwork

How to share your internet connection with a Hosted Network in Windows 10

Up to here, you created and started a Hosted Network in your Windows 10 PC. However, any wireless capable device won't be able to access the internet just yet. The last thing you need to do is to share an internet connection using the "Internet Connection Sharing" feature from a physical network adapter.
  1. Use the Windows key + X keyboard shortcut to open the Power User menu, and selectNetwork Connections.
  2. Next, right-click the network adapter with an internet connection – this could be a traditional Ethernet or wireless network adapter — select Properties.
    Note: In Network Connections, you should now see a new our new Microsoft Hosted Virtual Adapter which is labeled Local Area Connection* X, and with the SSID name.
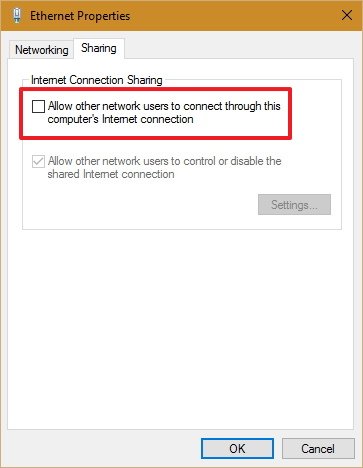
  3. Click the Sharing tab.
  4. Check the Allow other network users to connect through this computer's Internet connectionoption.
  5. Next, from the Home networking connection drop-down menu select the Microsoft Hosted Virtual Adapter.
  6. Click OK to finish.
At this point, you should be able to see and connect any wireless capable device to the newly created software access point, and with access to the internet.

How to stop sharing an internet connection with other devices in Windows 10

If you want to temporary stop allowing other devices to connect wirelessly through your computer, you can type the following command in the Command Prompt and hit Enter:
NETSH WLAN stop hostednetwork
At any time, you can just use the start variant of the command to allow other devices to connect to the internet using your computer as an access point without extra configuration:
NETSH WLAN start hostednetwork
Similarly, you can also use the following command to enable or disable a wireless Hosted Network:
NETSH WLAN set hostednetwork mode=allow
NETSH WLAN set hostednetwork mode= disallow

How to change a Hosted Network settings in Windows 10

In the case you want to change some of the current settings, such as SSID or network security you can use the following commands:
NETSH WLAN set hostednetwork ssid=Your_New_SSID
NETSH WLAN set hostednetwork key=Your_New_Passphrase

How to view the current Hosted Network settings

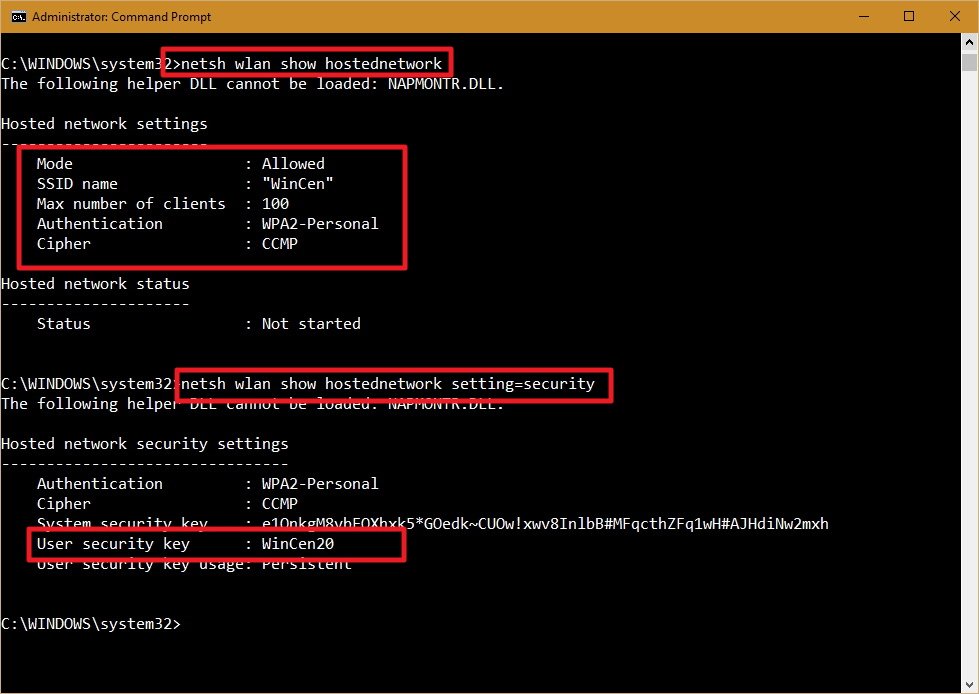
There are two commands to view the Hosted Network settings on your computer:
The following command shows the mode and SSID name in use, max number of clients that can connect, type of authentication, and cipher:
NETSH WLAN show hostednetwork
And the following command will also reveal the current network security key among other settings, similar to the previous command:
NETSH WLAN show hostednetwork setting=security

How to disable a wireless Hosted Network in Windows 10

While the setup of a wireless Hosted Network in Windows 10 is not very complicated, Microsoftdoesn't make very straightforward to remove the configurations when you no longer need the feature.
Although you can use the stop or disallow commands, these actions won't eliminate the settings from your computer. If you want completely delete the Hosted Network settings in Windows 10, you'll need to modify the Registry.
Important: Before you change anything settings on your computer, it's worth noting that editing the Windows Registry can be a dangerous game that can cause irreversible damages to your system if you don't know what you are doing. As such, it's recommended for you to make a full backup of your system or at least System Restore Point before proceeding with this guide. You have been warned!
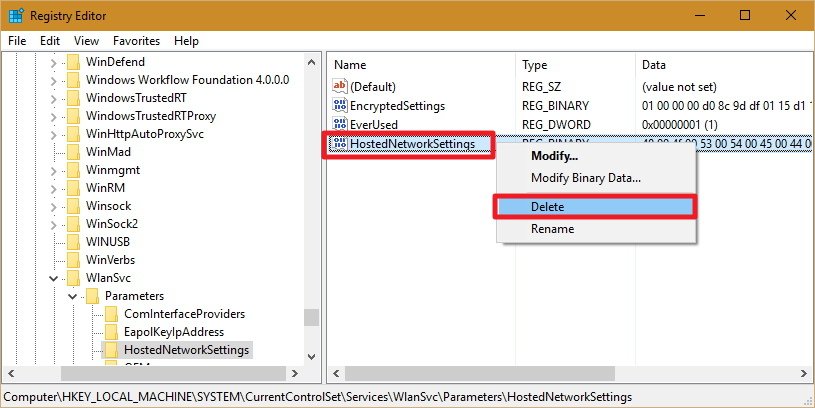
  1. Open the Start menu, do a search for regedit, hit Enter, and click OK to open the Registry with admin rights.
  2. Scroll down the following path in the Registry:
    HKEY_LOCAL_MACHINE\system\currentcontrolset\services\wlansvc\parameters\hostednetworksettings
    Right-click the HostedNetworkSettings DWORD key, select Delete, and click Yes to confirm deletion.
  3. Restart your computer
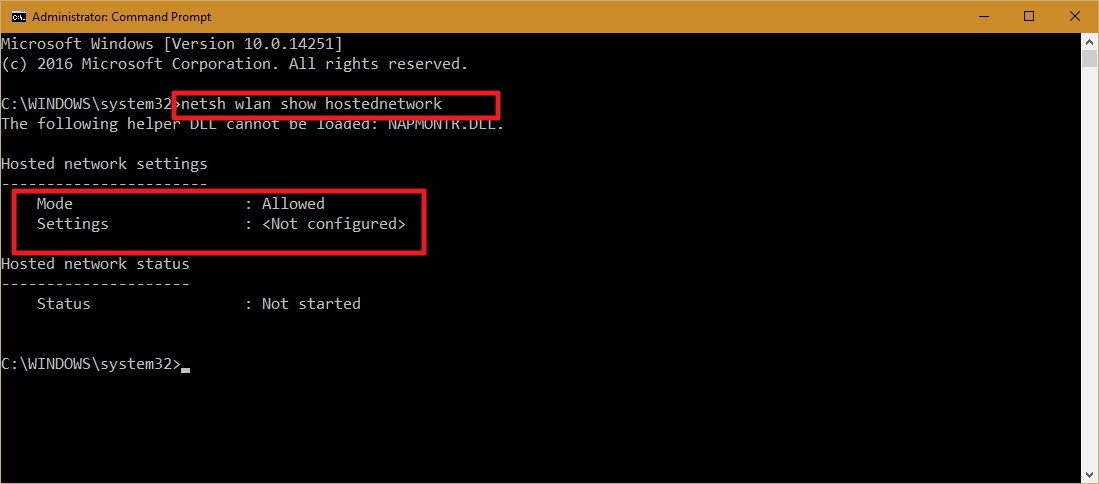
  4. Open to the Command Prompt and use the following command:
    NETSH WLAN show hostednetwork
    You will know that you have successfully deleted the settings when the Settings field readsNot configured.
  5. Make sure you turn off "Internet Connection Sharing" in the physical network adapter that was sharing the internet with other devices. Use the Windows key + X keyboard shortcut to open the Power User menu, and select Network Connections.
  6. Right-click the network adapter, and select Properties.
  7. Click the Sharing tab.
  8. Uncheck the Allow other network users to connect through this computer's Internet connection option.
  9. Click OK to complete the process.

Things you need to know

Although the wireless Hosted Network feature in Windows 10 allows you to implement an access point solution to share an internet connection with other devices, it's not meant to be a solution to replace a physical wireless access point.
Also, there are a few things you want to consider. For example, wireless speeds will dramatically be reduced compared to the rates provided from a physical access point. Perhaps it would not be a big deal for internet browsing, but downloading or transferring big files could be an issue for some users.
You also need to consider that your computer needs to be always turned on to act as a wireless access point. If the computer enters into sleep, hibernate, or restarts, your wireless hotspot will stop working, and you will need to start manually the feature using the NETSH WLAN start hostednetwork command.
You cannot run a SorftAP and ad hoc at the same time on Windows. If you need to create a temporary network connection between two computers, setting up ad hoc will turn off SoftAP — you can run one or the other, not both at the same time.

Wrapping things up

Wireless Hosted Network is a nifty feature in Windows can be a great tool to have for when you need to create a wireless access point on the go. It won't match the performance of a physical wireless access point, but it can be useful for many unexpected scenarios — like having one wired ethernet connection and several devices you want to get online. It's not a replacement for the real thing, but in a sticky situation, it can be just the fix you need.

ads